Thursday, May 9, 2019

May 2019 - Joyful Stars Blog Hop and May Stamp of the Month - To My Bestie!


Welcome to the May 2019 Joyful Stars Blog Hop!  If you came here from the artistic Andrea's blog, you've come to the right place!

Lately I have been drawn to clean and simple designs.  Maybe its an extension of feeling overwhelmed with work and other issues lately, but clean and simple card designs seem to have a calming effect on me.

While at a crop last month, I challenged myself to come up with a clean and simple card using the May Stamp of the Month, To My Bestie.  If you have seen this stamp set, you know about all the beautiful and cute images in this set.  However, in keeping with the clean and simple concept, I only used one image and one sentiment from the set.


I started by stamping the small bouquet image three times in VersaMark ink, then embossing in Ranger Silver Super Fine embossing powder.  Then I grabbed a paintbrush and just touched each of the flowers in the bouquets with a peach colored paint from Watercolor Paints.

Assembling and finishing the card was very easy at this point.   I cut a piece of B&T paper, A2 card sized, from the Sweet Girl paper pack and adhered to a White Daisy card base.  I cut a smaller piece of White Daisy cardstock and adhered to my card base.  Next I cut some small mats for my stamped images from Peach cardstock and adhered them to my card base, aligning down the left side.  The "I Could Not Ask for a Better Friend" sentiment was then stamped to the right using Pewter ink.

For the final touches, I mounted all three stamped images on foam tape and adhered to the Peach cardstock mats.  Tiny bows made from the Silver Embellishing thread was the perfect touch for the bouquets!

Did you know you can get your own copy of the To My Bestie stamp set for only $5.00?  See the details below to see how!


Each month you can purchase a new D-size stamp set, available for one month only, for just $5 - that's over 70% off retail!  When you place an order of $50 or more in Close To My Heart products, you qualify for this special Stamp of the Month pricing.  Otherwise, you can purchase this set outright for $18.95.


Now hurry on over to Joyce Houck's blog!  I promise you won't be sorry!


Tuesday, April 9, 2019

April 2019 - Joyful Stars Blog Hop and April Stamp of the Month - Love So Sweet!


Welcome to the April 2019 Joyful Stars Blog Hop!  If you came here from the versatile Debi's blog, you've come to the right place!

April must be a popular month for our CTMH Stamps of the Month.  I've seen so many samples of this beautiful stamp set, and it's no wonder - it is quite a lovely set!  I wanted to challenge myself to really think outside the box on this one, so thought I would go with some cheery rainbow colors. 


One of my favorite "colors" introduced in the last few years to the CTMH color palette is Charcoal.  Using White Daisy pigment ink, I decided to stamp the leaf cluster in the form of a wreath onto a piece of Charcoal card stock.  While letting the ink dry (and helping it along with a heat tool), I stamped the smallest butterfly from the set onto White Daisy card stock using Candy Apple, Nectarine, Lemon, Willow, Bluebird, Sapphire, Pansy, and Raspberry inks.  After fussy cutting each image, I used a black pen to outline the butterflies' bodies.

Next I used the largest square from the Stitched Square Frames die set to cut out the innermost stitched square from White Daisy card stock.  I adhered the stamped Charcoal piece to the center of the square.

The sentiment was then stamped directly onto a White Daisy card base, leaving room for the assembled stitched square.  The square was adhered to the card base, then the butterflies were attached using Thin 3-D Foam Tape.  Finally I used the smallest heart from the Stitched Hearts die set to cut a heart from White Daisy card stock.  I attached this to the center part of the wreath using Thin 3-D Foam Tape and added a single sparkle for a bit of pop.

Would you like to get your own copy of the Love So Sweet stamp set for only $5.00?  See the details below to see how!

 
Each month you can purchase a new D-size stamp set, available for one month only, for just $5 - that's over 70% off retail!  When you place an order of $50 or more in Close To My Heart products, you qualify for this special Stamp of the Month pricing.  Otherwise, you can purchase this set outright for $18.95.
Now please head over to Betty's blog to see what magic she has made!

Saturday, March 9, 2019

March 2019 - Joyful Stars Blog Hop!


Welcome back to the Joyful Stars Blog Hop!  If you have come here from the talented Debi's blog, you are on the right track!

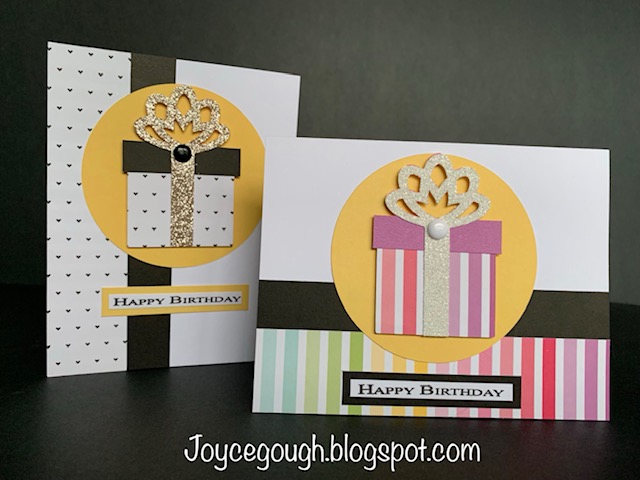
Deciding that I needed to have a stash of birthday cards handy, I decided to kill two birds with one stone and make them the focus of some workshops that I had planned to do.  So I took advantage of two of the great tools that Close To My Heart provides:  exclusive Cricut collections and How-To Books!

The Cricut collections provide me with the easiest way to design and quickly cut out pieces for cards.  The added bonus as a consultant is that I can easily multiply my cutting to get the biggest bang for the buck to make for quick work by my workshop attendees.

The How-To Books are just the ticket for easily replicating card and scrapbook page designs, but putting your own artistic spin on them.  And by using a desk pad, I can readily produce a cutting diagram to make the best use of a piece of paper.


Since this was designed to be a birthday card workshop, not only did I focus on pulling images that were celebratory in nature, but I wanted to be sure to use papers that were bright and cheerful.  The I Heart Us paper packet made a perfect marriage with our beautiful Glitter Papers!


I find that using two different patterns of CTMH patterned paper can elicit two unique looks that can appeal to the most discerning palettes.  The patterns used in this workshop from the I Heart Us paper packet provided the basis for two different themes for each set of cards.


Note that each set of two cards uses the same pattern but is designed vertically and horizontally.  Then by adding in two different theme combinations, you end up with two very different looks.


The addition of White Glitter Paper to the myriad of color helps to provide a nice contrast for the eye.  The Gold Glitter Paper with the Black Cardstock and pop of Canary Cardstock makes for really elegant cards. Glitter Papers provide that perfect pop of glitz that the birthday recipient should have on their special day! 


The Black and White Dots are a perfect addition to any paper crafting project.  The neutral nature of their "color", and the fact that they are relatively flat, come in multiple sizes, and are self-adhering make them a no brainer for me.


And although it's difficult to tell from my photos, these wouldn't be my cards if I didn't have Foam Tape under all of the Cricut elements!

If you have any questions about the products I used, please send me your asks in the comments!  In the meantime, be sure to check out the phenomenal work done at the one and only Betty's blog!


Saturday, February 9, 2019

February 2019 - Joyful Stars Blog Hop and February Stamp of the Month - Heartfelt Sentiments!


Welcome to the February 2019 Joyful Stars Blog Hop!  If you came here from the versatile Debi's blog, you've come to the right place!

Although I don't like to wish my days away, I certainly am looking forward to Spring.  As cold as it's been, I may have to hurt someone next Summer when I see a post where someone says "I can't wait for sweater weather.  Who's with me?"

Anyway, all this to say, I needed to see some cheery colors, so I love the new Seasonal Expression Idea Book!  In fact I took advantage of the February Stamp of the Month, Heartfelt Sentiments, to use some of our beautiful new colors to come up with a Spring-like card.


In using the Heartfelt Sentiments stamp set, I discovered that the large image was the perfect size for a standard A2 size card.  However, I really wanted to use a spotlight technique and add a second outline mat to the whole image, so I went with a larger size card (6.25" x 5").

First I stamped the large image in Intense Black ink on a piece of White Daisy cardstock.  Note that I used a stamp positioning tool so that I could take advantage of the placement for my spotlighted piece; however, it is not necessary to use one (just a little easier 😉).  After ensuring the ink was good and dry, I used a waterbrush to color the flower images using Bluebird, Carolina, and Pixie ink pads and the leaves using a Sage ink pad.  (With the ink pad closed, squeeze the lid into the base, open the pad, and pick up the ink from the lid with the waterbrush.  Joila!  Instant pallette!)

Next I used the same image to stamp a smaller piece of White Daisy cardstock in VersaMark ink, ensuring my placement and size was sufficient to include the portion of the image I wanted to spotlight.  I heat embossed this using Ranger Silver Super Fine embossing powder.

Finally I finished up the card by creating mats from Bluebird cardstock 1/8" larger than each of the stamped pieces.  I layered the large, watercolored piece on a White Daisy card base, then carefully lined up the spotlighted piece on top.  A few Clear Sparkles did the trick of putting the finishing touches on the card.


Each month you can purchase a new D-size stamp set, available for one month only, for just $5 - that's over 70% off retail!  When you place an order of $50 or more in Close To My Heart products, you qualify for this special Stamp of the Month pricing.  Otherwise, you can purchase this set outright for $18.95.

https://joycegough.closetomyheart.com/ctmh/promotions/sotm/2019/1902-heartfelt-sentiments.aspx

Now please head over to Michelle's blog to see what magic she has made!

Wednesday, January 9, 2019

January 2019 - Joyful Stars Blog Hop!

Happy new year and welcome back to the Joyful Stars Blog Hop!  If you came here from the artistic Betty's blog, I'm sure you were in awe of her work! This month I’ve created a layout for a class that I’m doing at a crop this weekend.  Although I used the Make It From Your Heart Vol. 2 as a basis for the design, I took advantage of Cricut Design Space to further create and design my elements.  I will be sharing some of those tips with my class.  
  
With the event of the new Seasonal Expressions 1 Idea Book, I chose the Something Fierce paper packet for my layout.  Now that the holidays are over, the bright colors are just the ticket for me to start out the New Year. 
 
 
The bases of the layout were created using Pattern 14 of Make It From Your Heart Vol. 2.  Papers used were the Something Fierce paper packet, Lemon cardstock, and Bluebird cardstock.  


Using Cricut Design Space, I recreated the base layout as a Design Space project.  I then chose the "pinwheel" from the retired Artiste Cricut cartridge and placed them on both layouts.  I also found the "Go.See.Do" and "This Way To Fun" sentiments and the "flag" from the You Are Here Cricut cartridge to include on each page.  Then choosing the "line" and "square" from the Shapes feature, I attached a journaling block to be cut and drawn.


While my Cricut machine cut (and drew) my elements out of Raspberry, Carolina, and Bluebird cardstock, I cut some mats from Ballerina cardstock and placed them on the bases.  I also cut some triangles from the new Stitched Quilt Shapes Thin Cuts from Bluebird cardstock and centered them next to the large mats on each of the bases.  I then adhered the title, sentiment, and flag to the layout.  Finally, the pinwheels were finished by using some retired White Daisy Brads and Bigger Brads in the centers.  I then cut and knotted some pieces of the Raspberry Baker's Twine and adhered to the back of each of the pinwheels using Glue Dots and adhering to the bases. 

I hope these tips were helpful and that everyone is having a Happy New Year!  Now please head over to Krista's blog to see the fruits of her work!


Sunday, December 9, 2018

December 2018 - Joyful Stars Blog Hop!

Welcome back to the Joyful Stars Blog Hop!  If you came here from the talented Betty's blog, thank you for continuing on here!

This month I'm focusing on a card using some of the cute Christmas items in our Holiday Expressions Idea Book.  As we tend to make lots of Christmas cards this time of year yet time is stretched due to all the additional events going on, I thought I would make this card, but also point out where corners can be cut to facilitate mass production.


For the top portion of the card, I cut a plaid piece from the 'Tis the Season paper packet and adhered to a White Daisy card base.  Next I cut 9 postage stamp squares from White Daisy cardstock using the Cricut® Artbooking Digital Collection.  I then stamped the 2 tree images from the Christmas Countdown stamp set in New England Ivy ink.  I adhered the squares using Thin 3-D Foam Tape, but to save time, they can simply be adhered straight onto the plaid paper.  Finally, I added some simple Clear Sparkles to the tops of each of the stamped trees.

For the bottom portion of the card, I cut a piece of the holly paper from the 'Tis the Season paper packet and adhered underneath the plaid piece onto the White Daisy card base.  I attached a piece of Candy Apple Striped Ribbon, centering it on the holly paper, and trimmed to the edges of the card.  I used the "FA" and "LA" images from the Christmas Countdown stamp set to create the sentiment.  These were stamped in VersaMark ink on White Daisy cardstock and embossed using the Ranger™ Red Tinsel Embossing Powder; however, to save time, the images can simply be stamped in a coordinating color, e.g., Candy Apple Red ink.  The sentiment was layered onto a scrap piece of New England Ivy cardstock, and attached with Thin 3-D Foam Tape to the top of the ribbon, but again, it can simply be adhered directly to the card to save time.

I hope these tips were helpful and that everyone is having a Merry Christmas and Happy Holidays!  Now please head over to Krista's blog to see her beautiful works of art!


Friday, November 9, 2018

November 2018 - Joyful Stars Blog Hop!


Welcome back to the Joyful Stars Blog Hop!  If you came here from the artful Betty's blog, thank you for continuing on here!

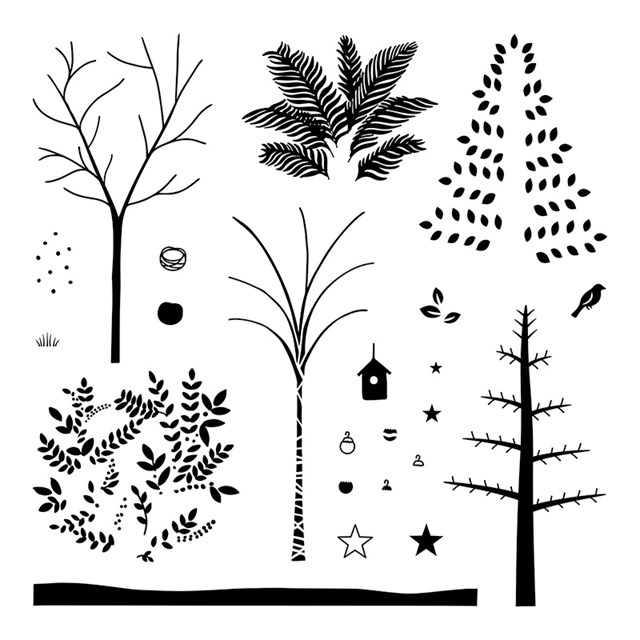
As I've been dying to have some fun with the November 2018 Stamp of the Month, Seasonal Trees, I decided to use that stamp set as the focus of my card this month.  As implied by the name, this versatile stamp set has trees from different seasons or climates.  Since we're quickly approaching the holiday season, I decided to make a Christmas card and proceeded with the approach of tradition over whimsy.


Upon first sight of the stamp set, I knew immediately I wanted to include Kraft Paper as a background for the tree.  I stamped the "bare tree" stamp in Espresso ink, then stamped the coordinating "leaves" stamp in New England Ivy ink.  To add "snow" to the tree, I offset the "leaves" stamp very slightly and re-stamped in White Daisy Pigment ink.  Then I grabbed the "snow" stamp and randomly stamped around the tree, again using the White Daisy Pigment ink.

Next, I free-hand cut some White Daisy Cardstock to make the "snow hills".  To add a bit of definition, I sponged a hint of Linen ink to the tops of the "hills".  Using Espresso ink, I then stamped the "'Tis the Season" sentiment from the Oh What Fun-Cardmaking stamp set at the bottom of one of the "hills", and layered the pieces on the Kraft Paper background.

To wrap up the card, I adhered the Kraft Paper background to a slightly larger piece of New England Ivy Cardstock and attached the whole thing to a White Daisy Card Base.  Using Pomegranate ink to add a pop of color, I stamped the "bird" image, fussy cut it, and used a tiny bit of Foam Tape to add it to the tree.  Finally, I finished off the card by cutting a small Cricut star from Gold Foil Paper using the Cricut Basic Shapes feature, and by attaching a few Gold Sequins with Liquid Glass.

Now head over to Krista's blog to see her beautiful work next!


Each month you can purchase a new D-size stamp set, available for one month only, for just $5 - that's over 70% off retail!  When you place an order of $50 or more in Close To My Heart products, you qualify for this special Stamp of the Month pricing.  Otherwise, you can purchase this set outright for $18.95.

Stamps