Wednesday, December 9, 2020

December 2020 - Joyful Stars Blog Hop and December Stamp of the Month - Happiness Never Grows Old!

Welcome back to the Joyful Stars Blog Hop! If you've just joined me from the beautifully artistic Krista's blog,  thank you for continuing on to join me here!

December is a hot time for birthdays for people I know and love.  As my mom's birthday is the first week of the month, I wanted to share the card that I made for her here.  Since she loves watercolor, my immediate thought was to use the December Stamp of the Month, Happiness Never Grows Old, as the basis for creating her card.  This stamp set has a number of beautiful images that you can use for different techniques, and watercolor is no exception.

I stamped one of the floral images from the Happiness Never Grows Old set using VersaMark ink onto Distress Watercolor Cardstock.  I then embossed it using Ranger Princess Gold Detail Embossing Powder.  Next, I used watercolors to watercolor the embossed image.  Using Gold Shimmer Brush, I spattered over the whole piece.  I then adhered a piece of Black cardstock to a White Daisy card base, then attached the watercolored piece to the card.


To finish the card, I stamped the "Happiness Never Grows Old" sentiment from the same stamp set onto a scrap of Black cardstock using VersaMark ink and embossed with the Ranger Princess Gold Detail Embossing Powder.  I adhered the sentiment to the card.  Finally, to complete the card, I attached a few Gold Sequins.

Now please head over to the wonderfully talented Marie's blog to see what beautiful work she has done!


Monday, November 9, 2020

November 2020 - Joyful Stars Blog Hop & Easy Stitching with Stitched Lattice Thin Cut

Welcome back to the Joyful Stars Blog Hop! If you've just joined me from the beautifully artistic Krista's blog,  thank you for continuing on to join me here!

The 2020 CTMH Idea Book has been a treasure trove of goodness for the kind of card making I like to do.  In addition to my beloved Distress Oxide inks, the background thin cuts have a favorite of mine, where many times I have used both of these product lines hand in hand.  This month, I stretched the use of one of those background thin cuts, i.e., the Stitched Lattice Background Thin Cut.


While quickly glancing at my messy workspace, I had my embellishing thread sitting close to the thin cut and had a vision pop into my head.  With the holes in the thin cut, I thought surely I could do something fun with it and the embellishing thread!

This first card was made by cutting the Stitched Lattice Background Die Cut on a piece of White Daisy cardstock.  I taped a length of Gold Embellishing Thread to the back of the die cut panel and threaded it through a needle.  Using the diamond pattern shown in the photo above, I brought the thread through the larger holes to complete the pattern, taping the end to the back when finished.  This took a little over two yards of the thread.  I adhered this panel to a White Daisy card base.

Next I used a red Sharpie marker to color some Clear Sparkles.  I adhered these to the large holes of the panel.

The "LOVE" sentiment was die cut out of Gold Foil Paper using the Simple Serif Uppercase Thin Cuts.  These letters were adhered to a piece of Scarlet Glitter Paper, which was die cut with the Stitched Brackets Thin Cuts.  Using 3-D Foam Tape, this was adhered to the card.

The second card was made very much like the previous card, but I used the negative Gold Foil Paper that was left from the first card.

This negative piece of Gold Foil Paper was adhered to a square of Scarlet Glitter Paper, which was then attached with 3-D Foam Tape to the card.


The final card was made much like the first two.  Instead, I used a blue Sharpie marker to color the Clear Sparkles and Sapphire Glitter Paper as the base for the "THANKS" sentiment, which was cut as a banner and attached with 3-D Foam Tape.

Now please head over to the wonderfully talented Marie's blog to see what the beautiful work she has done!


Saturday, October 31, 2020

Easy Distress Oxide Halloween Cards

Although I am getting this post out late on Halloween, I am getting it out so am calling this a win.  😊  I made these cards a month ago, and since they were pretty easy to make, I thought they might inspire you.

To make this card, I first created a stencil out of Grafix Stencil Paper, using the spider web image from the Cricut Artbooking collection.  I then used Black Soot Distress Oxide ink to blend over the stencil onto a piece of White Daisy cardstock.  A bit of spritzed water over the panel finished up the background.

The Got Candy? special includes sequins with spiders, so they were perfect to add to this card. I used Silver Embellishing Thread to thread through the holes in the spider sequins, adhered them to the card panel, then attached the thread over the top of the panel to the back with scotch tape.  The panel was adhered to a card size panel of Black cardstock then attached to a White Daisy card base.

 
To complete the card, I stamped the sentiment from the retired Say It All stamp set (C1632) using Black Pigment Ink on a scrap of White Daisy cardstock, then heat emboss using Ranger Clear Super Fine Embossing Powder.  I attached it to the card using 3-D Foam Tape.

 
To make this second card, I spritzed the uncleaned stencil I used from the first card and pressed it onto a piece of White Daisy cardstock to pick up the remaining Black Soot Distress Oxide ink.  The remainder of the card was completed exactly the same way, with the exception of the sentiment, which was stamped with Versamark ink onto a scrap of Black cardstock and heat embossed with Ranger White Super Fine Embossing Powder.

 
I love the organic look of the spider web on this second card!  My son, who is my most honest critic, loved these cards.  For this second one he made the comment that it looks like a spider web you see when looking out through a frosted window.  😊

Thank you for looking and I hope you have a Happy Halloween!


Friday, October 9, 2020

October 2020 - Joyful Stars Blog Hop & Distress Oxide Watercolor Celebration Card

Welcome back to the Joyful Stars Blog Hop! If you've just joined me from our wonderfully talented Krista's blog,  thank you for continuing on to join me here!

Recently I did a class for some fellow consultants on Distress Oxide inks and differences between those inks, the inks CTMH has in its product line, and regular Distress Inks.  As such I demoed some different techniques as well as showed some samples to illustrate the nuances of this special ink.  I love experimenting, especially with different types of inks, and seem to have inherited the moniker of "Bill Nye, the Science Guy" 😀


One of my favorite techniques to do with Distress Oxide inks is to watercolor.  I am a huge Kelly Latevola Taylor fan, so first and foremost, I want to say this card was wholly inspired by her.  Note that I made this card using the retired Party Balloons stamp set [Z4067], but I wanted to share the technique as you can readily substitute another stamp set to make a similar card.  To make this card, I first embossed the white balloons using Versamark ink and Ranger White Detail Embossing Powder on Ranger Watercolor Paper.  Next I used the "wet on wet" technique, by painting water heavily from corner to corner over the embossed balloons, then dropping Distress Oxide inks (Picked Raspberry, Mustard Seed, Mowed Lawn, Peacock Feathers, Chipped Sapphire, and Seedless Preserves), blending with the next color to provide a rainbow effect.  A heat tool was then used to dry the watercolored panel.  To finish the panel, I spritzed a bit of water over the watercolor, spattered additional Distress Oxide ink, then stamped "Celebrate" from the stamp set in Black dye ink.


To create the additional balloons, I blended the same Distress Oxide inks in the same order onto White Daisy cardstock.  I then spritzed water onto the blended ink, dried it with a heat tool, then cut the balloons out of the cardstock with the associated thin cuts from the stamp set.  After adhering 3-D Foam Tape to the backs of the die cut balloons, I strategically placed the balloons onto the watercolored panel.  The bows were cut using the Cricut and out of Black cardstock.  Finally, I spattered Clear Shimmer Brush over the card, although it is hard to see in the photo.

Now please head over to the wonderfully talented Marie's blog to see what the beautiful work she has done!


Wednesday, September 9, 2020

September 2020 - Joyful Stars Blog Hop & Reverse Stencil Technique

Welcome back to the Joyful Stars Blog Hop! If you've just joined me from our wonderfully talented Krista's blog,  thank you for continuing on to join me here!

I'm excited to debut something from our new Close to My Heart Core Idea Book!  I've never been so excited about a new book, but this one has everything you could ask for to use for your paper crafting purposes throughout the year.  From beautiful papers, to exciting new colors, to cute stamp sets, and to the artsy mixed media, this book has it all!  In particular, inks and how they are formulated have always appealed to the science soul in me.  

As such I decided to start this hop with the beautiful new Ranger Distress Oxide inks.  I was lucky enough to already own all the Distress Oxides introduced to CTMH, so it was a no brainer to start with a much loved technique of mine: reverse stenciling.


I created this card a few weeks ago when I received the new Stencil Collections from the new Idea Book.  I thought it was perfect for the reverse stencil technique.  This technique is done by blending inks onto a piece of cardstock, then using a stencil to apply black ink on top of the blended colors.  The Mandala stencil was perfect for this technique over some rainbow colors.


Here are the supplies I used to make this card:

Now please head over to the wonderfully talented Marie's blog to see what the beautiful work she has done!


Sunday, August 9, 2020

August 2020 - Joyful Stars Blog Hop & Retiring Colors

Welcome back to the Joyful Stars Blog Hop! If you've just joined me from our wonderfully talented Marie's blog,  thank you for continuing on to join me here!

This month I wanted to pay homage to our retiring colors.  Although I always feel a sense of sadness to say goodbye them, there are always I few for which I will miss more than others.  Here are the colors that are going away so please get your ink pads, re-inkers, and cardstock while you can!

The two I will particularly miss are Ruby and Sweet Leaf.  So for that reason, I created a card to highlight the two colors I will miss most.

For this card, I chose one of my favorite new stamps, Treasured Memories.  I wanted a water colored look with my flowers, so I swiped both my Ruby and Sweet Leaf ink pads on my craft mat, rubbed my stamps into the ink and stamped onto White Daisy cardstock.  Pieces of a zip strip from the Timber Paper Pack were adhered above and below the images.  A piece of the wood B&T paper from the pack was adhered to a White Daisy card base, and the previously assemble piece adhere on top.  The sentiment from the Winged Wishes stamp set was stamped in VersaMark ink onto a scrap of Black cardstock and embossed in Ranger White Super Fine Embossing Powder.  I finished the card with a few Bitty Sparkles on the centers of the flowers.  Although a simple card, I hope it will brighten the day of a friend.

Thanks for visiting!  Now for some awesome artwork, please continue with the hop over to the very talented Krista!


Thursday, July 30, 2020

July 2020 - July SOTM For My Beautiful Friend


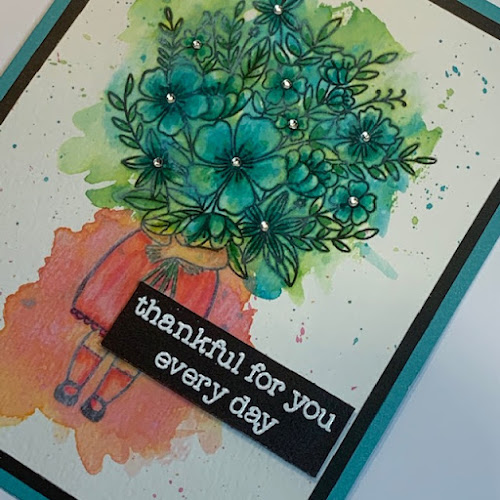
The July Stamp of the Month, For My Beautiful Friend, has been enticing me to take it out and play with it for the past month.  I finally made the opportunity happen during one of the sessions for our new Idea Book launch event.  I LOVE playing with mixed media so created the following card:


To make this card, I cut a panel out of watercolor paper and stamped the image from the For My Beautiful Friend stamp set using Intense Black ink.  After ensuring it was dry, I taped the image to a cutting board, laid down some clean, clear water over the flower bouquet using a brush, then randomly dropped some Mowed Lawn and Peacock Feathers Distress Oxide inks and heat set it.  Then I repeated the process to the bottom half of the girl using Mustard Seed and Picked Raspberry inks.  Finally, I added a few spatters from the brush over top of the whole panel with each of the colors I used.


After ensuring the image was dry, I used Spectrum Noir Tri-Blend markers to color in the images before taping it down to a Black cardstock panel and then a Lagoon standard-sized card base.


Next I stamped the sentiment onto Black cardstock with Versamark ink and heat embossed with Ranger White Super Fine Embossing Powder. The sentiment was then attached to the card using 3-D Foam Tape.


Finally, I added some Bitty Sparkles to the centers of the flowers to complete the card.


Each month you can purchase a new D-size stamp set, available for one month only, for just $5 - that's over 70% off retail!  When you place an order of $50 or more in Close To My Heart products, you qualify for this special Stamp of the Month pricing.  Otherwise, you can purchase this set outright for $18.95.

Thursday, July 9, 2020

July 2020 - Joyful Stars Blog Hop and Born to Bloom!


Welcome back to the Joyful Stars Blog Hop! If you've just joined me from our wonderfully talented Marie's blog,  thank you for continuing on to join me here!

This month I had a vision of a card using the Born to Bloom stamp set using rainbow colors.  Although slightly different than how I first imagined the card, I'm happy enough with the results.  Rainbow colors on a card are always so cheery, and let's face it, we all need a little color to brighten up the days we're living with right now!


To make this card, I first stamped the plants and pots with VersaMark ink onto different colors of cardstock (Candy Apple, Nectarine, Lemonade, Clover, Bluebird, and Almond) and heat embossed with Ranger White Super Fine Embossing Powder.  I then cut the images using the coordinating Born to Bloom Thin Cuts.


To assemble the card, I created a 3-1/2" x 8" card base out of White Daisy cardstock and adhered a Black cardstock panel of 2-3/4" x 7-3/4".  A piece of retired gold shimmer ribbon was attached to the bottom of the Black cardstock panel.  The sentiment was stamped from the Winged Wishes stamp set using Black ink.  Finally, I attached the potted plant images with 3-D Foam Tape and added Bitty Sparkles.

I hope you all enjoyed my rainbow!  Please continue on with the hop and visit the uber talented Krista's blog!

Tuesday, June 9, 2020

June 2020 - Joyful Stars Blog Hop and A Million Little Things!


Welcome back to the Joyful Stars Blog Hop! If you've just joined me from the wonderfully talented Marie's blog,  thank you for continuing on to join me here!

After my mojo left me last month, I decided to take a little break from creating and continue instead to work on getting more of my inventory into Evernote.  This break helped me tremendously and made me excited to do something I'm still learning and practicing, but that I find therapeutic when making cards, and that's doing watercolor.  So I pulled out my paints and watercolor paper and water colored an image that was calling my name. 😊


Using Intense Black ink, I stamped the rose flower from the A Million Little Things stamp set onto a scrap of Watercolor Paper, then used some watercolor paints to do some basic water coloring.  (Go easy on me - I'm still learning!)   It's difficult to see in the photo above, but if you look at the close up photo below, you can see that after I finished the painting, I spattered some shimmer from the Black Shimmer Brush over the image.  I then cut it to size and matted on Black and Ruby cardstock.  The sentiment was also stamped from the A Million Little Things stamp set using Black ink and a card base cut from French Vanilla cardstock.  The matted rose image was then mounted onto the card base using 3-D Foam Tape.  Finally just a few Clear Sparkles were added as a finishing touch.

Here is a closeup of the card where you can see the shimmer of the Black Shimmer Brush.


Now for those of you who were curious about which Mother's Day card I gave my mom last month after really not liking my cards, the answer is neither one!   I ended up making a brand new card, which I liked much better.  I've been enjoying seeing a rainbow of colors on various social media sites and thought maybe I could try my hand at one.  So I pulled out the Floral Borders stamp set, inked up the solid floral border image with Candy Apple, Nectarine, Lemonade, Clover, and Sapphire inks, overlapping the color next to it.  I stamped this on a piece of White Daisy cardstock, then added a strip of Black cardstock as a border and thin strip of Gold Foil Paper underneath.  This was matted onto a piece of Black cardstock and mounted on a White Daisy card base.  The sentiment was taken from the Mother's Day Door stamp set, stamped in VersaMark ink onto a scrap of Black cardstock, embossed in Ranger White Super Fine Embossing Powder, and attached to the card using 3-D Foam Tape.  Finally, the card was embellished with a few Gold Glitter Gems.  Isn't it funny that you can be happier with the outcome of a less time consuming card to make?


Here is closeup of the card:


Now please do me a favor and head off to Krista's blog to see a wealth of creativity on display!